How To Trim An Orchid’s Dead Roots & Why You Should: A Step-By-Step Guide With Pictures
Should You Trim An Orchid's Dead Roots? The Importance Of Maintaining An Orchid's Roots
Have you looked at your orchid's roots lately? Your plant may appear healthy on the surface, but what lies beneath can be frightening. In this post, I discuss how to trim an orchid's dead roots & why it may benefit your orchid. If you look at your orchid's roots, whether while repotting or by chance, you may be disturbed by what you see. Brown, shriveled, desiccated shells now hang where once plump, silvery green roots flourished. A disturbing sight I know, but you are not alone as it's something every orchid grower must face at some point. As part of an ongoing orchid series for the home gardener, I am sharing what I've learned through my own orchid "growing pains" and those of my friends and fellow orchid growers. This post is really as much about the significance of saving orchid roots as it is about identifying roots that are no longer viable. I also show you how it may benefit your plant to trim dead roots and only these roots, and how to remove them so you don't harm your orchid.
***You should be certain any roots are dead before removing them. If you have any doubts as to your orchid's root viability, you can learn how to stimulate root growth on an orchid with barely any roots here... Try this hydration method to see if there is any chance roots can still absorb moisture...
If you do think any roots may still be viable, err on the side of keeping them. Roots are critically important to an orchid, and we don't want to remove them casually.
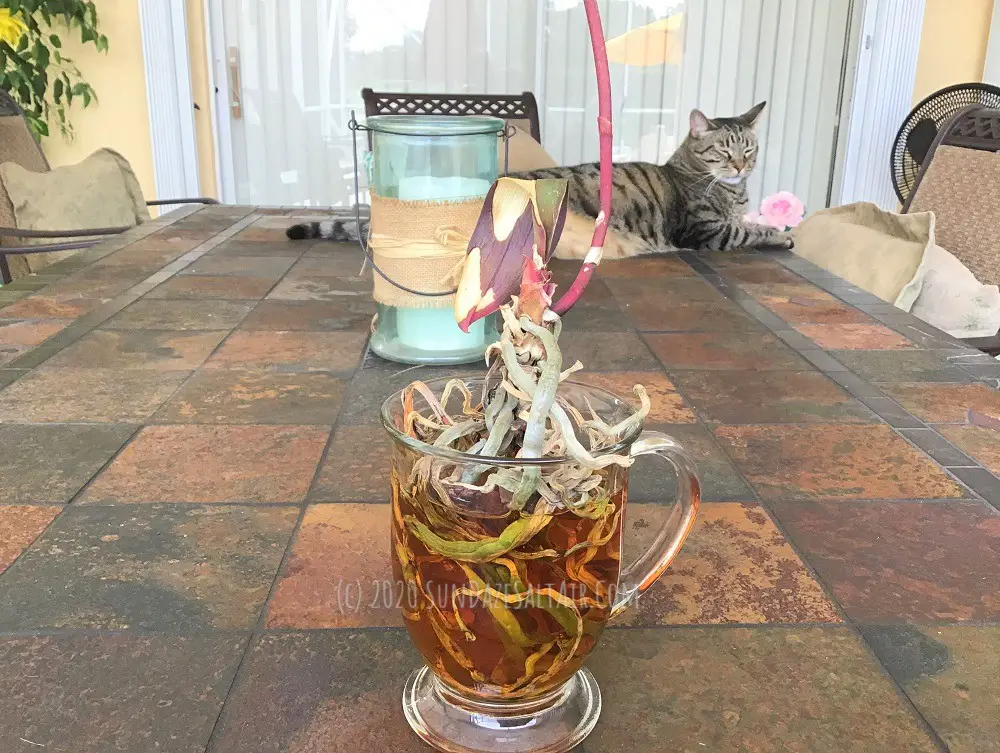
***Learn how a cup of tea can revive a dehydrated, dry orchid here....
TIP! Regular Monitoring of Root Health Is Key
Remember, once you get to the point where your orchid has a lot of dehydrated, dead roots, your orchid has already lost valuable, life-giving roots. This is the danger of neglecting your orchid's potting situation too long. Instead, be proactive by regularly monitoring your plant in its potting mix. It only takes a minute to check the health of your orchid's roots & its potting mix.
***To learn more about how, when & why to repot a Phalaenopsis orchid, check out this post...
Four Reasons Why You Should Monitor & Trim Your Orchid's Dead Roots
Note: This post contains some affiliate links for which a small commission may be earned if you decide to make a purchase through a link.
Many times, what appears to be a healthy orchid plant has hidden dead roots that are only uncovered when potting mix is combed through and peeled away. This is one reason you often hear the recommendation that you repot your orchid every six months to a year or so. I would take it further and recommend that you check your potted orchid's potting mix every two or three months. If everything looks fine, the roots are healthy and there is good ventilation, you can wait to repot -- but you won't know until you inspect it.
1. Degraded Potting Mix Holds Too Much Moisture Leading to Decaying Roots
The combination of potting mix decay, whether from old and worn sphagnum moss or bark, plus chronic moisture, creates a dangerously acidic environment. Prolonged exposure to this overly acidic environment can cause your orchid's potted roots to decay and die off, threatening your plant's survival.
Store-Bought Orchids: Risky Potting
Many store-bought orchids are sold wrapped only in sphagnum moss, known for its ability to keep roots moist but also for its tendency to degrade quickly with frequent watering and require replacement. As a matter of fact, if your orchid is potted only in sphagnum moss, you will likely have to repot and replace the potting medium as often as every couple of months. Especially with indoor orchids that are watered frequently.
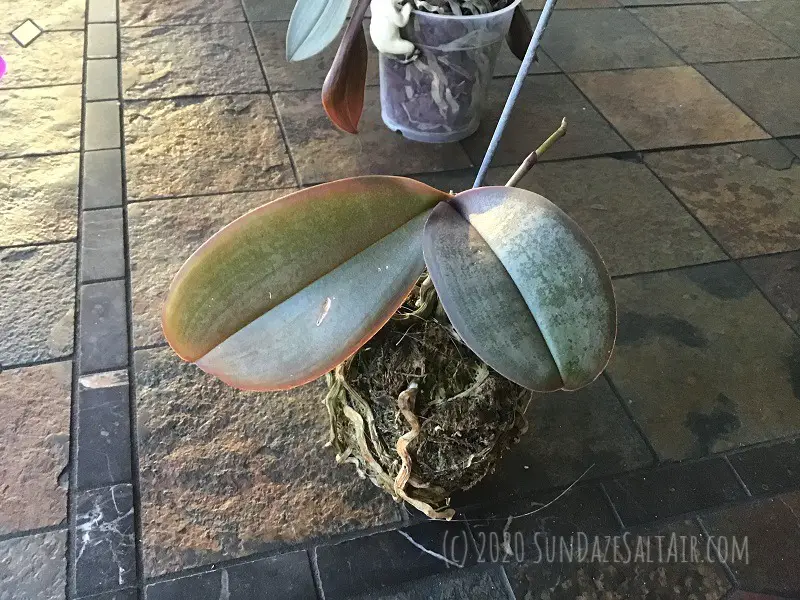
Not to mention, commercially sold orchids are often sold in pots without any drainage hole, wrapped in moss. I have seen damage and rot set in fairly quickly in such cases, as you can observe in the orchid pictured at the bottom of this post. Remember, stores are in the business of making money and wouldn't make nearly as much if orchids were sold in a way that maximized their longevity. Especially since orchids, with proper care, can be one of the longest living plants you'll ever own.
Alternatively, underwatered orchids, whether in sphagnum or other potting media, may also have roots that have died off, making it important that you monitor these roots to avoid further decay in the potting medium.
Don't Wait Until Your Orchid Shows Visible Signs of Poor Health as Roots May Already Be Damaged
Unfortunately, many orchid growers don't notice root issues until their plant shows visible signs of poor health. At this point, roots likely have already become damaged.
2. Dead Roots Ultimately Lead to Dehydration
Ironically, while all that degrading potting mix may hold on to too much moisture, the long-term effect is that it is decreasing your orchid's ability to absorb water. Dead roots cannot absorb water and the roots that are living in this chronically wet environment may begin to rot and become diseased and thus, incapable of hydrating the plant.
While most outdoor orchids obtain a lot of their moisture needs through their aerial roots while outside, indoor orchids, in contrast, rely on their potted roots. The presence of dead and dehydrated potted roots can lead to fewer overall healthy roots. The fewer healthy roots your orchid has, the less water it is able to absorb and the more your plant's resources will be strained.
3. Removing Dead Roots & Adding Fresh Potting Media Can Stimulate Your Orchid's Growth & Ability to Flower
Once potted roots have died, an orchid must rely solely on any remaining healthy air root roots for all of its hydration and nutrient needs. This means they alone have to do all the work, sapping your orchid's vital energy and often, its ability to bloom.
TIP! Are all dried, brownish orchid roots dead? Not so fast.! Be sure to try the hydration measures mentioned throughout this post, since not all brown roots have lost viability, as you can see below...
4. Whether from Overwatering or Underwatering, Decaying Roots Can Harbor Bacteria & Spread Fungal Infection
Not only can dead roots sap energy from your plant, but any dead or decaying matter allowed to exist in your orchid's potting media can harbor harmful bacteria. This may eventually lead to a fungal infection that can be toxic to your entire orchid.
*Reminder: Even potting media made up primarily of orchid bark will eventually degrade in time which is why you want to check all your orchids periodically to see if they need repotting with fresh media. Learn the signs & how to repot your Phalaenopsis here...


********
The Importance of Orchid Roots - Critical to an Orchid's Survival
All plants depend on healthy roots to thrive, but in the case of most orchids, healthy roots play such a critical role in survival that even soil is unnecessary. Being epiphytic in nature, most orchids absorb water and essential nutrients from the air and surrounding environment through their "air roots" - no soil needed.
Because of this important role air roots play in an orchid's survival, you want to ensure that your orchid's air roots are healthy and unbound. This means allowing all the "tentacle-like" air roots of your orchid to be free to grow in all directions to seek necessary ventilation, moisture and nutrients.
Believe it or not, healthy roots, along with a healthy stem, can even help an orchid survive with barely a leaf... How? Orchids actually have the ability to photosynthesize through their roots, not only through their leaves like most plants. This unique ability enables orchids to make "food" through their roots. As a result, a leaf-less orchid can theoretically grow a new leaf -- provided it has a healthy stem on which to grow it on.
Fun Fact: The unique roots of an epiphytic orchid such as a Phalaenopsis, allow the plant to attach itself to an object. Yes, epiphytic orchids, unlike soil-bound plants, can grow in the air and attach themselves to trees, other plants, and even rocks...
TIP! Prevention Is the Best Medicine
Taking the simple steps of identifying and removing any detritus not only makes it more likely that your orchid flowers but may even save your orchid from dangerous fungus and dehydration. To this end, I have a number of preventative care steps detailed in various posts which can be found if you type "orchid" in the search bar at the top of this page...
Should You Trim Air Roots? Absolutely Not!
When trimming orchid roots, you want to distinguish between aerial roots and the roots that grow inside a pot, which I refer to as potted roots.
You definitely do not want to cut or trim or in any way alter orchid aerial or "air roots" as they are your orchid's lifeline. Cutting an orchid's air roots decreases the plant's ability to absorb vital water and nutrients from the air. Epiphytic orchid air roots are actually covered in a unique sponge-like tissue called velamen, which is what enables the orchid to absorb water and nutrients from its surroundings while in the wild.
Air Roots to the Rescue of Damaged Potted Roots
In contrast to low maintenance aerial roots, roots growing inside pots or potting mix, are susceptible to damage in overly moist potting conditions. Which is why potted roots need to be maintained in a healthy state.
Technically, the more air roots your orchid has, the healthier it is and, since air roots essentially maintain themselves in the open air, there should never be any reason to cut them.
Your orchid's air roots may be all your plant has to sustain itself in the event its pot-bound roots are damaged from prolonged exposure in a chronically moist environment.
Bottom-line: Leave Aerial Roots & Healthy Roots Alone & Only Trim Diseased, Dead Roots
********
What Do Healthy Orchid Roots Look & Feel Like?
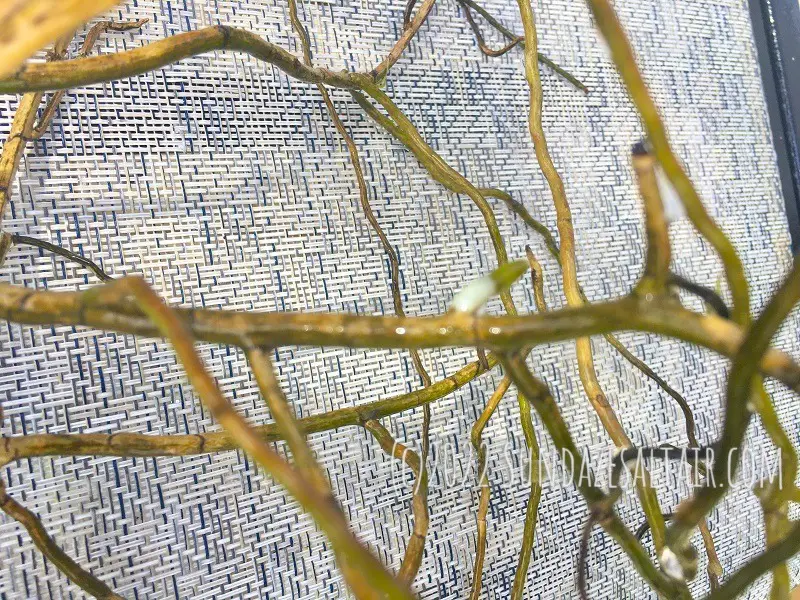
Since you are reading this, you have likely, unfortunately, seen the result of orchid roots left too long in degraded potting mix. Brownish and shriveled and papery or dark and mushy, unhealthy roots are never a pretty sight.
Contrast those with the silvery or green, plump roots visible in some of the photos here. If you were to touch the roots of each, very likely you could readily identify the difference in the two through touch alone. The healthy roots feel supple and plump, while the unhealthy roots feel like old, dry paper that easily disintegrates in your hand. Or, in the case of extreme over-watering, they will feel soft and mushy.
As for air roots, healthy orchid air roots are also plump and often silvery, but colors can also be greenish, and even a brownish maroon in color and still be healthy. Orchid air root tips often have a distinctive green or yellow color to their fleshy root tips.
How To Trim Your Orchid's Dead Roots
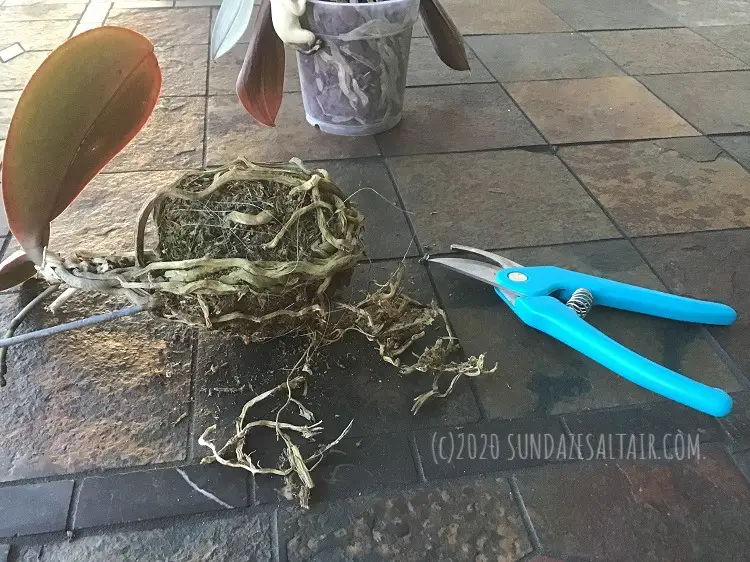
1. Lay Out Newspaper or an Old Towel & Have A Bowl Handy
In order to find the dead roots that need to be trimmed and pruned away, you will need to peel away layers of old potting mix and this will get messy. If you don't have any newspaper or towels lying around, keep a bucket handy so you can sweep any debris for easy disposal.
TIP: Keep in mind that old orchid potting mix can make a good compost for your garden and repurpose it accordingly.
2. You Will Need: A Pair of Sterilized Garden Shears, Scissors or Other Sharp Cutting Tool & A Hydrogen Peroxide Solution
While decaying orchid root matter often breaks off into your hand, you will want to use a pair of sterilized shears or scissors for stubborn stems. Be sure your cutting tool is clean and thoroughly disinfected, so you don't spread any fungal infection.
***To make a hydrogen peroxide or isopropyl alcohol solution to sterilize shears & roots/stems:
You can easily sterilize your cutting tool by making a solution of 9 parts lukewarm water to 1 part common 3% hydrogen peroxide (or isopropyl alcohol). Combine the solution in a spray bottle to also use later throughout the pruning process. Submerge the shears in the solution for 30 seconds, remove and let dry on a paper towel. You can then use this same solution to gently clean and disinfect any cut orchid roots or stems to prevent bacterial transfer.
3. Gently Remove Orchid from Pot & Carefully Rinse Its Roots with Warm Water
As you rinse your orchid's roots, gently comb out old potting media with your fingers. Rinsing your orchid's roots with warm water performs the dual purpose of helping to dislodge potting matter from your orchid's roots while also allowing you to identify the healthy from unhealthy roots.
4. Distinguish Healthy Roots from Unhealthy
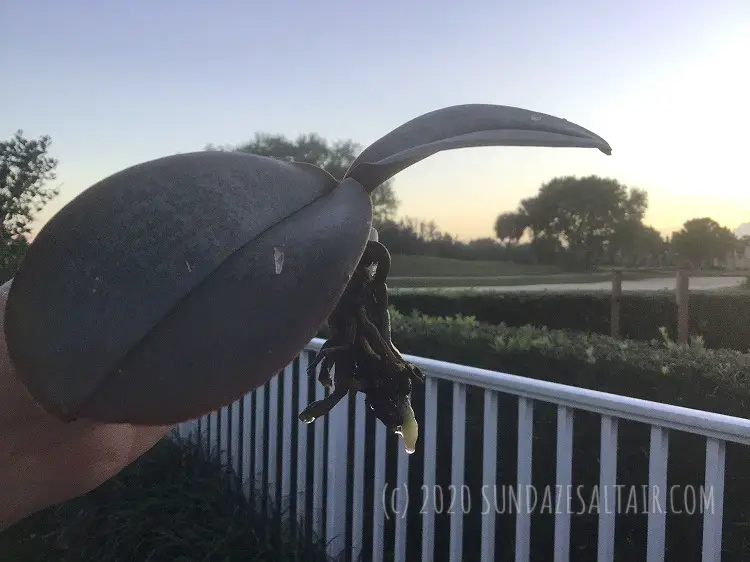
As an orchid grower, you are probably familiar with how your orchid's healthy roots will plump up slightly when you water them. As we saw in the sunburned Vanda photo above, however, not all healthy roots always look the same.
You will typically witness a color change with healthy roots. Silvery roots will likely turn greenish as they happily quench their thirst on the water, while plump green roots are likely already sufficiently hydrated. In the case of a sunburned but still viable orchid root, on the other hand, while it may be brownish in color, it is still tough and firm to the touch, rather than flat and papery thin.
In contrast, any brownish and "flattened" roots you see will usually be unresponsive to watering as they are likely already dead. Unhealthy roots may also be dark and soft or "mushy" in the unfortunate case of a rotting orchid root. This, of course, is the opposite of the firm appearance you want to see in healthy orchid roots.
5. Cut & Remove Only Dead, Rotted Roots, Sterilizing Your Cutting Tool Between Cuts
Now that you have distinguished the healthy from the unhealthy roots, start to trim sparingly. Gently tugging on roots that appear dead should cause those roots to easily slip off, leaving behind what appears to be a brown string. You can then easily cut these off. Using your cutting tool, cut as low as you need to remove the dead root. There should be no reason to trim much at all. Of course, leave any plump and healthy roots alone.
TIP! Avoid Accidentally Cutting Any Viable Roots
If you inadvertently trim viable roots, you could cause your orchid to experience "shock" and the inability to absorb sufficient water, potentially harming an otherwise healthy orchid.
6. Apply A Natural Fungicide as Needed
Sterilize your shears between each cut by letting them soak in the hydrogen peroxide solution for a few seconds to kill any bacteria.
If you find any roots are brown and soggy, then you should take this extra step.
Dark and soft, mushy roots indicate possible root rot fungus has set in. Treat the cut root with the diluted hydrogen peroxide solution and then sprinkle some cinnamon, a natural fungicide, over it to prevent further infection.
WARNING! Unless you are treating a fungal problem, do not let any cinnamon get onto healthy orchid’s roots as it can be extremely drying.
*Reminder to beware of overwatering. While many orchids are adapted to receiving large amounts of sunlight, no orchid ever wants to be left in standing water or soggy potting media. The end result is often toxic root rot and fungus.
7. Cut the Non-Blooming Flower Spike -- Cut It Down Now for More Growth Later
It may be painful to do it but more than likely your orchid plant's flower stalk, or spike, is not flowering anyway. And it will not do so until your orchid is healthy enough to flower again. Therefore, save your orchid plant from expending unnecessary energy by cutting back its flower stalk now as you prune. Once your orchid regains its health and vitality, new growth will soon appear where the dying stalk now stands.
Conclusion: Assess & Trim Your Orchid's Potted Roots Periodically to Prevent Decaying Roots from Suffocating Your Orchid
While Air Roots Are Critical, Pot-Bound Roots Also Need to Remain Healthy
While pot-bound roots are not highly visible like air roots, they still need to stay in good shape. As we have seen above, even when an orchid displays robust air roots, the presence of dead potted roots can become a breeding ground for bacteria and sap vital energy.
Allowing them to degrade can silently breed bacteria and suffocate the life out of your orchid.
Avoid this by taking a few minutes to occasionally inspect your orchid's roots, and you have a good chance of catching any problems early -- and possibly saving your orchid.
********
Have you saved an orchid recently? Share your orchid rescue story down below...


You May Also Like
How to Grow Torch Ginger Lilies: How to Take Care of a Torch Ginger Curcuma Plant
It May Be Late Summer But Signs Show Fall Is In The Air… Plus Is My Geranium Dead Or Just In Need Of Pruning? Rescuing Summer-Weary & Wilted Geraniums From The Florida Heat